This is a project I did a while ago. I made a gold bra and belt for a belly dancing costume. The bra and belt bases were made to fit, then covered with shiny gold fabric. The fabric is stretchy and the “shininess” is a bit awkward to get a needle through. Not impossible, it just takes a little more time. Once the pieces are covered they are ready to be embellished!
Gold Belly Dance Belt
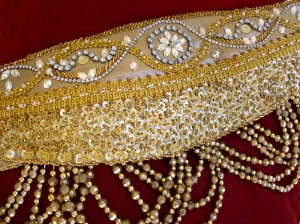
I began by sewing the gold gimp trim on to get the pattern started. Once that was on the rhinestone chain was couched down on top of the wavy gimp. So that the fabric gimp didn’t look lame and unglamorous, I added AB (aurora borealis) finished and silver-lined glass beads on top to sparkle it up.
Then on to the bottom of the belt, which is a simple sequin-bead arc with gold holographic sequins and three silver-lined gold beads. This always goes much faster than you think it would, which is a nice change when doing beadwork!
Back up to the top I spent a long time laying out the crystals and short bits of rhinestone chain between the gimp and long chain. When I settled on the final design the trick is to keep it in mind while sewing the bits on. A quick sketch on paper that you can keep beside you (even better if you place the items right on top of the drawing, so you know exactly what you are doing) and it goes fairly quickly. I also put a few larger flat holographic sequins held on by one chunky AB bead in there to tie the sequin look together and a few gold bugle beads to strengthen the look of the thin rhinestone chain.

Gold Belt – close up
The edges of the belt are finished off with a spiral edging stitch. This stitch lays more to the front, with the spiral going just over the top (or bottom) edge, then around again in a diagonal line. Again, this generally goes faster than you think it will. It takes a lot of beads, but it looks fantastic and gives a smooth, thick and lovely finish. The bottom spiral is looser because the looped fringe is sewed on and it doesn’t need as much.
Lastly, yes the looped fringe. The hardest part of this is getting the loops even and the proper loopiness by marking the belt where the loops start/end. It takes time to test and retest and once you have got it figured out write down the exact number of beads / patterns / belt marking measurements for each loop or you will be slowed down and frustrated.
The loops are best double sewn with doubled thread (so 4 threads for each) and sewn on separately so that if one gets caught and breaks, it won’t affect the rest of the belt.
Line the inside with complementary hued and non-slippery fabric, sew on a few huge snaps and trouser hooks to hold the belt together and shimmy on….


